Author: Content Creator

  • Step-by-Step: How to Set Up Your PMU Tattoo Machine

    There’s a quiet magic in the moments before something beautiful is created. When I think about the world of permanent makeup, it’s not just about the stunning results, but the incredible care and precision that go into every single detail. It’s like watching a skilled artist prepare their canvas, ensuring everything is just right before the first stroke.

    Behind every perfectly defined brow or softly blushed lip, there is a meticulous process, and at the heart of it all lies the permanent makeup (PMU) machine. It is the artist’s trusted tool, and its preparation is paramount. Today, I want to pull back the curtain a little and demystify how to set up a PMU tattoo machine, highlighting the professionalism and thoughtful care involved in achieving safe and beautiful outcomes.

    Behind the Beauty: How Your PMU Tattoo Machine is Prepped for Perfection

    1. Introduction: The Foundation of Flawless PMU

    In the world of permanent makeup, precision and safety aren’t just buzzwords; they are the bedrock upon which stunning and safe results are built. For anyone considering or simply curious about cosmetic tattoo procedures, understanding the intricate groundwork is fascinating. The PMU tattoo machine is undeniably the central instrument in this artistry.

    This post aims to demystify the machine setup process, offering a glimpse into the professional steps and meticulous care involved. It’s about more than just plugging things in; it’s about adhering to the highest hygiene standards and ensuring client safety in every step within the beauty industry.

    2. Understanding the PMU Tattoo Machine: An Overview

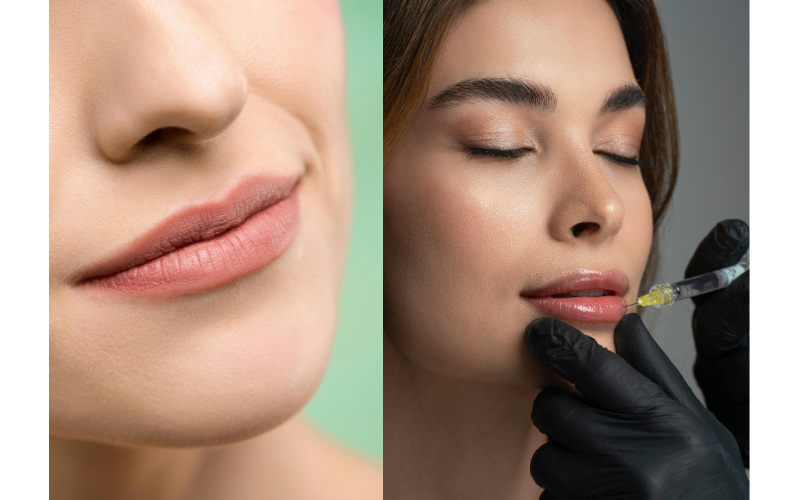
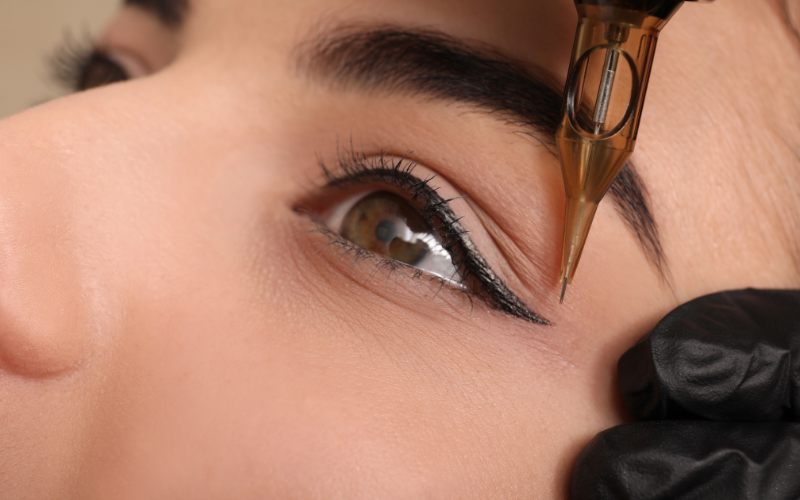
    At its core, a PMU machine is a specialized device designed to gently implant pigment into the skin’s upper layers, creating lasting beauty enhancements. Unlike traditional tattoo machines, PMU devices are typically quieter, lighter, and engineered for fine, delicate work.

    While various types exist, rotary machines are most common in permanent make-up due due to their smooth, consistent operation. Key machine components include the machine body itself, a power supply to regulate energy, a foot pedal for hands-free activation, and specialized needle cartridges or bars.

    3. Essential Pre-Setup Preparation: Prioritizing Hygiene and Safety

    Before even thinking about how to set up a PMU tattoo machine, a series of critical preparations must be completed. This foundational stage is all about creating a fortress of cleanliness and safety.

    3.1. Sterilization and Sanitation: The Golden Rules

    The absolute paramount consideration is a sterile environment. Every surface, every tool that could come into contact with the client or the machine, must be meticulously cleaned and disinfected. Professionals use medical-grade disinfectants to thoroughly sanitize work areas.

    Crucially, nearly all components that interact directly with the client’s skin are single-use and disposable. This relentless focus on hygiene standards is the front line against cross-contamination.

    3.2. Personal Protective Equipment (PPE): Protecting Professional and Client

    Just as vital as a clean environment is the proper use of Personal Protective Equipment. This includes, but is not limited to, disposable gloves, protective masks, and sometimes face shields. PPE acts as a barrier, safeguarding both the artist and the client, ensuring sanitation protocols are upheld throughout the procedure.

    3.3. Organizing the Workspace: Efficiency Meets Cleanliness

    A well-organized workspace isn’t just about aesthetics; it’s about efficiency and maintaining cleanliness. Every tool has its place, and the layout minimizes unnecessary movement or potential for contamination. Barrier protection, such as clear films, covers surfaces and equipment that cannot be sterilized between clients.

    4. Step-by-Step Guide: How to Set Up a PMU Tattoo Machine

    Once the environment is spotless and ready, the focus shifts to the precise steps involved in expertly setting up a PMU tattoo machine.

    4.1. Power Supply Connection: Getting Started

    The first physical step is connecting the PMU machine to its power supply unit. This unit is critical as it controls the voltage delivered to the machine. Understanding voltage settings is vital, as different procedures or skin types may require varying power levels for optimal pigment implantation.

    4.2. Foot Pedal Attachment: Hands-Free Operation

    For seamless control during the procedure, a foot pedal is attached to the power supply. This allows the artist to activate and deactivate the machine hands-free, maintaining focus and precision without interruption.

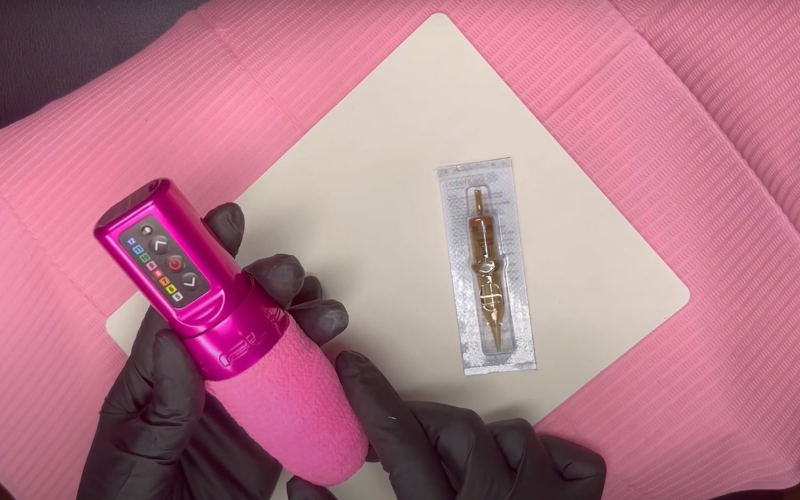
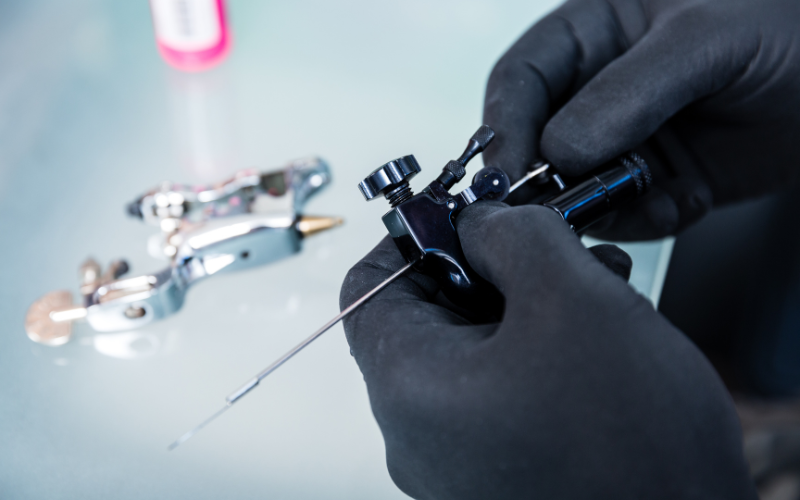
    4.3. Needle Cartridge Selection and Insertion: Precision Matters

    This is where the artistry truly begins. The artist carefully selects the appropriate needle type for the desired outcome whether it’s a single needle for fine hair strokes, a shader for soft effects, or a liner for crisp outlines. These sterile needles come in pre-packaged, single-use cartridges.

    The cartridge is then carefully inserted into the machine, ensuring it clicks securely into place. This “”click”” is paramount; it confirms proper attachment, preventing any wobble that could compromise precision during the procedure.

    4.4. Grip and Barrier Film Application: Maintaining Sterility

    To further maintain sterility and provide a comfortable hold, the machine body and grip are meticulously wrapped with a professional barrier film or specific grip cover. This protective layer ensures that the machine itself remains free from contamination, even during the procedure, and provides a stable, ergonomic grip for the artist.

    4.5. Tray and Pigment Preparation: Ready for Application

    Finally, a sterile tray is prepared. This includes individual pigment caps, carefully selected pigments (often mixed to achieve the perfect shade for the client), and any other disposable tools needed during the process. The careful handling of pigment colors ensures no cross-contamination and accurate application.

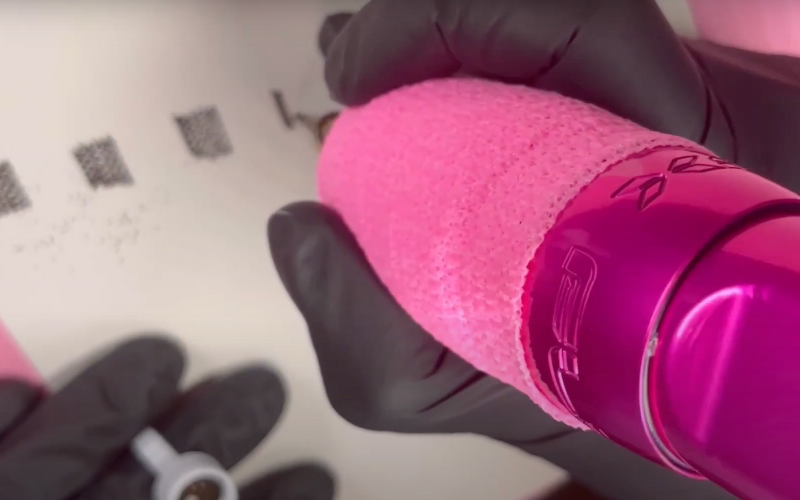
    5. Pre-Procedure Checks: Ensuring Optimal Performance and Safety

    Before any contact with the client, a skilled artist performs a series of crucial pre-procedure checks. This is the machine calibration and performance check. A test run is often done on practice skin or a similar material.

    This allows the artist to precisely assess needle protrusion and fine-tune depth settings, ensuring accuracy and consistency. They’ll verify smooth machine operation and minimal vibration, indicating everything is running optimally. Double-checking all connections and ensuring everything is secure is the final safety check before commencing the procedure.

    6. The Professional’s Commitment: Beyond the Setup

    Setting up the machine is just one facet of the PMU artist’s dedication. This deep dive into how to set up a PMU tattoo machine highlights their commitment to professional standards. Beyond the technical setup, there’s an ongoing commitment to continuous training, staying abreast of the latest industry regulations, and adhering to best practices.

    The artist’s dedication extends to client comfort, safety, and ultimate satisfaction. This includes meticulous machine maintenance post-procedure and strict protocols for proper waste disposal of all biohazardous materials, ensuring a clean and safe environment for everyone.

    For a deeper, more personal look into the daily realities and growth of a PMU artist, explore Vivi’s beauty journey – where she shares her honest reflections and real experiences in permanent makeup.

    7. Conclusion: Confidence in Every Stroke

    Exploring the meticulous process of setting up a PMU tattoo machine reveals the depth of care and precision that goes into permanent makeup. It’s not just about the art; it’s about the science of cleanliness and the careful preparation that underpins every procedure.

    This intricate preparation is what truly contributes to both the artistry and the unwavering safety of PMU. Knowing the detailed protocols involved should give you immense confidence in your chosen artist and the quality PMU you receive. The goal is always to provide beauty enhancement with the utmost level of safety and professionalism.

  • The Ultimate Guide to Lip Tinting: Everything You Need to Know

    Tired of constantly reapplying lipstick throughout the day? Do you dream of waking up with perfectly colored, beautifully defined lips without any effort? If so, then lip tinting might be the beauty solution you’ve been searching for. This innovative semi-permanent makeup procedure is revolutionizing how we approach everyday beauty, offering a refreshed, natural look that lasts.

    In this comprehensive guide, we’ll delve deep into the world of lip tinting, exploring exactly what it is, its myriad benefits, what happens during the procedure, essential aftercare, and everything else you need to know to make an informed decision about this popular cosmetic treatment.

    What Exactly is Lip Tinting?

    Lip tinting, often referred to as semi-permanent lip makeup, lip blushing, or a cosmetic lip tattoo, is a specialized form of permanent makeup. It involves the meticulous implantation of colored pigments into the upper layers of the lips to enhance their natural color, shape, and definition. Unlike traditional body tattoos, the pigment used for cosmetic tattooing is specifically formulated for facial application, and the technique is much gentler.

    A key difference from traditional tattoos lies in the depth of pigment implantation. While body tattoos penetrate deep into the dermis, lip tinting pigments are deposited more superficially, typically at the boundary between the epidermis and dermis. This shallower depth, combined with the specialized pigments, results in a softer, more natural appearance that fades gracefully over time, rather than changing color. It allows for natural, subtle enhancement that complements your existing features.

    The Allure of Lip Tinting: Why Consider It?

    The growing popularity of lip tinting isn’t just a trend; it’s a response to a desire for effortless, long-lasting beauty. The benefits extend far beyond just saving time in your daily routine.

    Effortless Beauty & Time-Saving

    Imagine never having to worry about smudged lipstick, faded color after a meal, or the need to constantly reapply. Lip tinting offers unparalleled makeup convenience, ensuring your lips always look their best, from the moment you wake up to the end of your day. This significant time-saver is a major draw for busy individuals.

    Natural-Looking Enhancement

    One of the most appealing aspects of lip tinting is its ability to create a natural lip color enhancement. Instead of an opaque, “”made-up”” look, pigments are chosen to complement your natural lip tone, resulting in a healthy, youthful, and subtly defined appearance. It enhances what you already have, rather than completely changing it.

    Correcting Asymmetry & Defining Shape

    For those with slight asymmetry, uneven borders, or fading lip lines, lip tinting can be transformative. A skilled permanent makeup artist can subtly define the lip line, giving the illusion of fuller-looking lips and correcting minor imbalances to create a more harmonious facial aesthetic. It’s about enhancing your natural beauty, not drastically altering it.

    Long-Lasting Results

    While not truly permanent, the results of lip tinting are impressively lasting. Typically, the vibrant color can last anywhere from one to three years, depending on various factors, before a color refresh is needed. This longevity is a significant advantage over daily cosmetic applications.

    Boosted Confidence

    Waking up with perfectly tinted lips can genuinely boost self-confidence. Knowing your lips look consistently beautiful, without any effort, provides a significant psychological uplift and simplifies your daily routine.

    The Lip Tinting Procedure: What to Expect Step-by-Step

    Understanding the process can help alleviate any anxieties you might have about getting your lips tinted.

    1. Initial Consultation

    Your journey begins with a thorough consultation with your qualified permanent makeup artist. This is where you discuss your desired results, color preferences, and the artist will evaluate your natural lip shape and analyze your skin tone to help you select the most flattering pigment. They may show you examples of healed results and perform a patch test for allergies, if deemed necessary.

    2. Preparation on the Day

    On the day of your appointment, your artist will clean the lip area thoroughly. A topical numbing cream will be applied to ensure your comfort throughout the procedure, minimizing any potential discomfort.

    3. Pigment Application

    Once the numbing has taken effect, the artist will begin the pigment application. Using a specialized cosmetic tattooing machine equipped with a sterile, single-use needle, they will meticulously implant the chosen pigment into your lips. The technique involves delicate layering and shading to build beautiful, even color and definition. The process requires a steady hand and an artistic eye.

    4. Immediate Aftermath

    Immediately after the procedure, your lips will likely appear more intense in color, and you can expect some swelling and redness. This is a normal part of the process and will subside within a few days.

    5. Duration of the Procedure

    The entire lip tinting procedure, including consultation, numbing, and application, typically takes between 2 to 3 hours.

    Is Lip Tinting Safe? Addressing Concerns & Contraindications

    Safety is paramount when considering any cosmetic procedure. When performed by a certified, experienced, and highly skilled artist in a sterile environment, lip tinting is a safe procedure.

    Safety Measures

    Always choose an accredited technician who operates in a clean, professional, and sterile beauty salon. Ensure they use single-use, disposable needles and high-quality, government-approved pigments. Proper hygiene and adherence to health and safety regulations are non-negotiable.

    Potential Risks & Side Effects (Temporary)

    Temporary side effects are normal and include swelling, slight bruising, tenderness, and eventually scabbing or flaking. These are part of the natural healing process and typically resolve within a week.

    Contraindications

    Certain conditions may make you unsuitable for lip tinting. These include pregnancy, breastfeeding, autoimmune diseases, certain blood thinners, active cold sore outbreaks, or a history of keloid scarring. Always disclose your full medical history to your artist during the consultation.

    Cold Sores

    If you are prone to cold sores, lip tinting can trigger an outbreak. Your artist will typically recommend prophylactic antiviral medication prescribed by your doctor to mitigate this risk, starting a few days before and continuing after the procedure.

    Lip Tinting Aftercare: Maximizing Your Results & Ensuring Proper Healing

    Proper lip tinting aftercare is crucial for optimal healing, color retention, and longevity of your results. Adhere strictly to your artist’s instructions.

    Immediate Aftercare (First 24-48 hours)

    Avoid hot, spicy, or acidic foods and drinks. Sip through a straw. Gently blot your lips with clean tissue. Apply a thin layer of recommended aftercare ointment frequently to keep lips moisturized and aid healing. Icing can help reduce swelling.

    The Healing Journey (Days 3-7)

    Your lips will begin to scab and flake during this period. It is vital not to pick or peel the scabs, as this can pull out pigment and lead to uneven color or scarring. The color may appear patchy during this phase. As the scabs naturally fall off, the color underneath will look lighter and softer.

    Long-Term Care

    Protect your lips from excessive sun exposure, as UV rays can cause the pigment to fade prematurely. Use an SPF lip balm. Avoid harsh chemical exfoliants or strong anti-aging products directly on your lips, as they can also accelerate fading. Keep your lips well-hydrated.

    Expected Healing Timeframe

    Initial healing typically takes about 5-10 days, but the full color development and settling period can take up to 4-6 weeks.

    Longevity & Touch-Ups: Maintaining Your Perfect Pout

    While lip tinting offers significant longevity, it’s not entirely permanent, allowing for adaptability as trends or your preferences change. On average, you can expect your lip tinting results to last between 1 to 3 years.

    Factors Affecting Longevity

    Several factors influence how long does lip tinting last, including your skin type, metabolism, lifestyle (e.g., sun exposure, smoking), medications, and the specific pigment color used (lighter colors tend to fade faster). Consistent sun protection and proper aftercare significantly extend the lifespan of your lip tattoo.

    Importance of Touch-Up Sessions

    To maintain the vibrancy and definition of your lip color, annual touch-up sessions or a color refresh are highly recommended. These sessions allow your artist to reinforce the existing pigment and make any necessary adjustments to the color or shape, ensuring your lips always look fresh and beautiful.

    The Cost of Lip Tinting: What to Budget For

    The cost of lip tinting varies depending on several factors, reflecting the artist’s expertise and the quality of the service. Generally, the lip tinting price can range from approximately $500 to $1500 or more for the initial procedure.

    Factors Influencing Price

    These include the artist’s experience and reputation, the clinic’s location, the inclusions (e.g., a follow-up session, aftercare kit), and the complexity of the desired outcome. While it may seem like a significant upfront investment, consider it an investment in daily convenience, confidence, and long-term beauty savings from purchasing traditional lip products.

    Choosing the Right Lip Tinting Artist & Clinic

    The skill of your artist is the most critical factor for beautiful and safe results. Do your research diligently. If you’re in search of premium lip tinting services in a professional setting, consider clinics like Hivivi, where expertise, hygiene, and artistry come together to deliver consistently stunning results.

    Key Criteria:

    • Certification & Licensing: Ensure the artist is certified in permanent makeup and licensed according to local regulations.
    • Experience & Portfolio: Look for a comprehensive portfolio of healed lip tinting work. Assess the consistency and quality of their results.
    • Hygiene & Sterilization: Non-negotiable. The clinic should be impeccably clean, and the artist should follow strict sterilization protocols.
    • Client Testimonials & Reviews: Read feedback from previous clients to gauge their satisfaction and the artist’s professionalism.
    • Personality & Communication: Choose an artist you feel comfortable with, who listens to your goals, and communicates clearly about the process and aftercare.

    Lip Tinting vs. Other Lip Enhancements

    It’s important to differentiate lip tinting from other popular lip enhancement procedures.

    Lip Tinting vs. Lip Fillers

    Lip tinting (or lip blushing) focuses on enhancing the color and subtly defining the shape of the lips. Lip fillers, on the other hand, add volume and plumpness to the lips using hyaluronic acid. They serve different purposes, but can often be combined for a comprehensive lip transformation, first enhancing the shape and color with tinting, then potentially adding volume with fillers for a complete look.

    Lip Tinting vs. Daily Lipstick/Stains

    The primary difference is permanence and convenience. Daily lip products require constant reapplication, smudging, and fading. Lip tinting offers a smudge-proof, lasting lip color that requires no daily effort, freeing you from the constant need for touch-ups.

    Conclusion

    Lip tinting offers an incredible opportunity to enhance your natural beauty with long-lasting color and definition. It’s a safe, effective, and empowering procedure that saves time, boosts confidence, and provides a perpetually polished appearance. By understanding the process, adhering to aftercare, and choosing a qualified professional, you can enjoy the many benefits of beautifully tinted lips.

    If you’re ready to transform your smile and simplify your beauty routine, we encourage you to book a free consultation today with an experienced permanent makeup artist. Embrace the ease and elegance of effortless beauty!

  • Review PMU Machine: How to Choose the Right Device for Your Craft

    When it comes to permanent makeup, your machine directly affects both your results and your reputation. In this article, we’ll review PMU machines in-depth—helping you compare top options, understand key features, and choose the right device for your needs. Whether you’re a beginner investing in your first machine or a seasoned artist looking to upgrade, this guide will simplify the process so you can focus on delivering beautiful, long-lasting results.

    Understanding PMU Machine Types: Rotary vs. Pen

    The first step in any PMU machine review is understanding the fundamental technology. While traditional coil machines exist in the broader tattoo world, the PMU industry predominantly relies on rotary and pen-style machines for their precision and gentleness.

    Rotary PMU Machines: Smooth Operation & Versatility

    Rotary PMU machines are powered by a small, enclosed electric motor that drives the needle in a smooth, cyclical motion. This consistent movement makes them significantly quieter and lighter than coil machines. Their versatility is a major advantage, as they can be used for a wide range of permanent makeup procedures, including powdered brows, lip blushing, and eyeliner. 

    Many premium PMU service providers like Hivivi use rotary machines for their precision and gentle approach. Because they cause less trauma to the skin, they can contribute to better healing and pigment retention. They are an excellent choice for beginners and artists who value a multi-purpose tool.

    PMU Pen Machines: Ergonomic Design & Precision

    A PMU pen is a specific type of rotary machine designed to mimic the feel and balance of a pen. This ergonomic design offers exceptional control and comfort, drastically reducing hand and wrist fatigue during long procedures. These devices almost exclusively use a hygienic cartridge needle system, where the needle and its housing are a single, disposable unit. 

    This design often includes a membrane to prevent the backflow of ink and bodily fluids into the machine grip, ensuring maximum safety. PMU pens are favored by experienced artists for fine line work, such as delicate hair strokes in microblading or crisp eyeliner.

    A Note on Coil Machines

    You may hear about coil machines in the context of traditional tattooing. They operate using electromagnetism, which creates a loud, buzzing sound and significant vibration. While powerful, they are heavier and generally considered too harsh for the delicate facial skin involved in PMU, making them a rare choice in this specialized field.

    Key Features to Consider When Reviewing PMU Machines

    Beyond the basic type, several key features determine a machine’s performance. A thorough review of any PMU machine should analyze these aspects to gauge its true value.

    Power & Motor Quality

    The motor is the heart of your machine. High-quality motors, such as those from Swiss brand Faulhaber, provide consistent, reliable power without fluctuations. This stability ensures that pigment is implanted at a uniform depth, leading to smoother results and less need for touch-ups. A strong motor maintains its performance even when working on more resistant skin.

    Stroke Length

    Stroke length is the distance the needle travels in one cycle. A shorter stroke (e.g., 1.8mm to 2.5mm) is gentle and ideal for depositing soft layers of color, perfect for shading and pixelated effects. A longer stroke (e.g., 3.0mm to 4.0mm) is more powerful and better suited for creating crisp lines. Some advanced machines offer an adjustable stroke, giving you the versatility to switch between lining and shading techniques with a single device.

    Ergonomics and Comfort

    Your health and comfort are paramount. Look for a machine that feels balanced in your hand. Consider the weight and the grip diameter. A lightweight, well-balanced machine with a comfortable grip minimizes vibration and reduces artist fatigue, allowing for greater precision over longer sessions.

    Needle Compatibility

    Most modern PMU pens use cartridge needles. It’s crucial to know if a machine uses universal cartridges – which are widely available from many brands – or proprietary cartridges that only fit that specific machine. Universal compatibility offers more flexibility and is often more cost-effective.

    Corded vs. Wireless Options

    A wireless PMU machine offers unparalleled freedom of movement, eliminating the hassle of a cord. This is a significant advantage for artist comfort. However, you must consider battery life and charging time. Corded machines offer unwavering, consistent power and are often lighter since they don’t contain a battery pack.

    Top PMU Machine Review Snippets

    Here’s a look at how to apply these criteria to popular machine types available on the market. This will help you understand what to look for in a product description.

    Example 1: The High-End Wireless Pen (e.g., Microbeau-style)

    • Key Features: Wireless operation with long battery life (5+ hours), lightweight aircraft aluminum body, short stroke length (e.g., 2.5mm) optimized for PMU, high-end motor.
    • Pros: Ultimate freedom of movement, extremely low vibration for client comfort, excellent precision for detail work like hair strokes.
    • Cons: Premium price point, may require proprietary cartridges.
    • Ideal For: Experienced artists specializing in detailed brow, lip, and eyeliner work who prioritize cordless convenience and top-tier performance.

    Example 2: The Versatile Beginner-Friendly Pen (e.g., Dragonhawk-style)

    • Key Features: Affordable price, compatible with universal tattoo cartridges, adjustable needle depth, reliable coreless motor. Often available in both corded and wireless versions.
    • Pros: Excellent value for money, great for learning, versatility for various PMU techniques, wide availability of needles.
    • Cons: May have slightly more vibration than premium models, battery life on wireless versions might be shorter.
    • Ideal For: Beginners, artists on a budget, or professionals needing a reliable backup machine.

    Essential Accessories for Your PMU Setup

    Your permanent makeup device is only one part of the equation. To ensure professional results and safety, you’ll need quality accessories. This includes a stable digital power supply unit (PSU) for corded machines, reliable cartridge needles with safety membranes, and disposable grips or barrier film to maintain impeccable hygiene.

    PMU Machine Maintenance & Longevity

    Protect your investment by following proper maintenance protocols. Always clean and disinfect the exterior of your machine between clients using industry-approved wipes. Never submerge your machine in liquid. Follow the manufacturer’s recommendations for any internal lubrication. Proper care not only ensures client safety but also extends the life and performance of your PMU device.

    FAQs About PMU Machines

    What is the best PMU machine for beginners?

    A lightweight, user-friendly rotary pen with a shorter stroke length (around 2.5mm) is often recommended. A device that uses universal cartridges is also a great choice for beginners as it offers more flexibility and affordable needle options.

    What’s the difference between a tattoo machine and a PMU machine?

    While functionally similar, PMU machines are specifically engineered for working on the delicate skin of the face. They typically have shorter stroke lengths, lower operating voltages, and finer needle configurations to allow for more precise, less traumatic pigment implantation.

    How often should I replace my cartridges?

    Always use a new, sterile cartridge for every client, without exception. Needles should be disposed of in a sharps container immediately after the procedure is complete to prevent cross-contamination.

    Conclusion

    Choosing the right tool is a critical step in your journey as a PMU artist. A thorough review of any PMU machine should go beyond the price tag and focus on the factors that truly matter: motor quality, stroke length, ergonomics, and how these features align with your specific artistic style. By understanding these core components, you can confidently select a permanent makeup device that feels like a natural extension of your talent.

    Armed with this knowledge, you are now better equipped to find the machine that will not only improve your work but also enhance the comfort and safety of your clients for years to come.